Difference between revisions of "Setup Guide for Beginners"
Pl4sma2389 (talk | contribs) |
|||
| (45 intermediate revisions by 4 users not shown) | |||
| Line 1: | Line 1: | ||
| − | + | [[Category:Car Setup]] | |
| + | [[Category:Guides]] | ||
| − | + | == Tyres == | |
| + | [[File:Acc_wiki_carsetup_tyre.jpg|thumb|Current Setup / TAB Tires]] | ||
| + | |||
| + | === Pressure === | ||
| + | |||
| + | For GT3, Cup and ST cars the tyre pressure between 27.0 and 28.0 PSI is optimal for dry tyres. For wet tyres, it is between 30 and 31 PSI. | ||
| + | For GT4 cars, tyre pressures between 26.5 and 27.0 PSI are optimal while racing in dry conditions. | ||
| + | |||
| + | What should you think of: | ||
| + | # Get tyre pressures in the range between 27 - 28 PSI resp. 26.5 - 27 PSI for GT4 cars. | ||
| + | # Use IMO tyre temperatures for tweaking of camber and toe settings | ||
| + | # If for whatever reason your tyre temperatures aren't in the operation window, use brake duct settings, since heat from the brakes also effects tyre temperatures | ||
| + | |||
| + | === Toe === | ||
| + | |||
| + | Angle of the wheels, looking from above. You should only have toe out in the front, and only toe in at the rear. | ||
| + | |||
| + | {| class="wikitable" | ||
| + | |- | ||
| + | ! In !! Out | ||
| + | |- | ||
| + | | [[File:Sgfb_toe_in.png|left]] || [[File:Sgfb_toe_out.png|left]] | ||
| + | |} | ||
| + | |||
| + | === Camber === | ||
| + | |||
| + | Camber enables more tyre surface area to touch the track, giving more grip, countering leaning of the car while turning. You should only have negative camber. | ||
| + | |||
| + | {| class="wikitable" | ||
| + | |- | ||
| + | ! Neutral !! Negative !! Positive | ||
| + | |- | ||
| + | | [[File:Sgfb chamber 0.png|left]] || [[File:Sgfb chamber -5.png|left]] || [[File:Sgfb chamber +5.png|left]] | ||
| + | |} | ||
| + | |||
| + | Check IMO Readings to set camber angle. | ||
| + | |||
| + | {| class="wikitable" | ||
| + | |- | ||
| + | ! Negative !! Positive | ||
| + | |- | ||
| + | | [[File:Sgfb chamber negative.png|left]] || [[File:Sgfb chamber positive.png|left]] | ||
| + | |} | ||
| + | |||
| + | === Caster === | ||
| + | |||
| + | Caster angle impacts the stability of the car and how heavy the steering feels. It also causes car to steer to self center. For Sim Racers, that's not too important because of FFB settings, so it's best to leave it at the stock angle. | ||
| + | |||
| + | {| class="wikitable" | ||
| + | |- | ||
| + | ! Neutral !! Negative !! Positive | ||
| + | |- | ||
| + | | [[File:Sgfb_caster_neutral.png|left]] || [[File:Sgfb_caster_negative.png|left]] || [[File:Sgfb_caster_positive.png|left]] | ||
| + | |} | ||
| + | |||
| + | == Electronics == | ||
| + | |||
| + | == Fuel & Strategy == | ||
| + | |||
| + | === Brake Pads === | ||
| + | There are 4 types of brake pads. By default, type 2 is selected. | ||
| + | |||
| + | Type 1: High performance, high wear. About 2.5 hours lifetime. | ||
| + | |||
| + | Type 2: Medium performance, medium wear. About 12 hours lifetime. | ||
| − | + | Type 3: Low performance, low wear. Used for cold conditions and rain. | |
| − | |||
| + | Type 4: Very high performance, very high wear. Not normally used, but can be used for short practice and qualifying stints. | ||
| + | == Mechanical Grip == | ||
| + | == Dampers == | ||
| + | == Aero == | ||
== Solutions to Handling Issues == | == Solutions to Handling Issues == | ||
<div style="float:left; margin-right:1em;"> | <div style="float:left; margin-right:1em;"> | ||
| − | {| class="wikitable" width=" | + | {| class="wikitable" width="300px" |
|+ Braking | |+ Braking | ||
! Loss of Control | ! Loss of Control | ||
| Line 22: | Line 90: | ||
|} | |} | ||
| − | {| class="wikitable" width=" | + | {| class="wikitable" width="300px" |
|- | |- | ||
! Front Tyres often lock | ! Front Tyres often lock | ||
| Line 29: | Line 97: | ||
|} | |} | ||
| − | {| class="wikitable" width=" | + | {| class="wikitable" width="300px" |
|- | |- | ||
! Car pitches to much | ! Car pitches to much | ||
| Line 36: | Line 104: | ||
|} | |} | ||
| − | {| class="wikitable" width=" | + | {| class="wikitable" width="300px" |
|- | |- | ||
! Nose hits floor | ! Nose hits floor | ||
| Line 46: | Line 114: | ||
|} | |} | ||
| − | {| class="wikitable" width=" | + | {| class="wikitable" width="300px" |
|- | |- | ||
! Excessive locking | ! Excessive locking | ||
| Line 55: | Line 123: | ||
<div style="float:left; margin-right:1em;"> | <div style="float:left; margin-right:1em;"> | ||
| − | {| class="wikitable" width=" | + | {| class="wikitable" width="300px" |
|+ Turn in | |+ Turn in | ||
! Understeer | ! Understeer | ||
| Line 72: | Line 140: | ||
Move brake bias backward | Move brake bias backward | ||
|} | |} | ||
| + | |||
| + | {| class="wikitable" width="300px" | ||
| + | |- | ||
| + | ! Oversteer | ||
| + | |- | ||
| + | | <b>All Speeds:</b> | ||
| + | 1. Adjust rear tyre pressure<br/> | ||
| + | 2. Stiffen front anti-roll bar<br/> | ||
| + | 3. Decrease front toe out<br/> | ||
| + | 4. Stiffen diff coast locking<br/> | ||
| + | 5. Soften front springs<br/> | ||
| + | |||
| + | <b>Mid-High Speed:</b><br/> | ||
| + | Increase rear wing angle or Decrease front wing angle | ||
| + | |||
| + | |} | ||
| + | |||
| + | {| class="wikitable" width="300px" | ||
| + | |- | ||
| + | ! Lift off oversteer | ||
| + | |- | ||
| + | | | ||
| + | 1. Increase diff coast locking<br/> | ||
| + | 2. Increase pre-load value | ||
| + | |} | ||
| + | |||
</div> | </div> | ||
<div style="float:left; margin-right:1em;"> | <div style="float:left; margin-right:1em;"> | ||
| − | {| class="wikitable" width=" | + | {| class="wikitable" width="300px" |
|+ Corner Exit | |+ Corner Exit | ||
! Understeer | ! Understeer | ||
|- | |- | ||
| − | | 1. | + | | <b>All Speeds:</b> |
| + | 1. Stiffen rear anti-roll bar<br/> | ||
| + | 2. Increase diff power locking<br/> | ||
| + | 3. Stiffen rear springs<br/> | ||
| + | |||
| + | <b>Mid-High Speed:</b><br/> | ||
| + | Reduce rear wing angle or increase front wing angle | ||
| + | |} | ||
| + | |||
| + | {| class="wikitable" width="300px" | ||
| + | |- | ||
| + | ! Oversteer | ||
|- | |- | ||
| − | | 2. Decrease slow damper | + | | <b>All Speeds:</b> |
| + | 1. Soften rear anti-roll bar<br/> | ||
| + | 2. Decrease diff power locking<br/> | ||
| + | 3. Soften rear springs<br/> | ||
| + | |||
| + | <b>Mid-High Speed:</b><br/> | ||
| + | Increase rear wing angle or decrease front wing angle | ||
| + | |} | ||
| + | |||
| + | {| class="wikitable" width="300px" | ||
| + | |- | ||
| + | ! Lift off oversteer | ||
| + | |- | ||
| + | | <b>PICNIC</b> | ||
| + | (Problem in chair, not in car) | ||
| + | |} | ||
| + | |||
| + | {| class="wikitable" width="300px" | ||
| + | |- | ||
| + | ! Car bounces during weight transfer | ||
| + | |- | ||
| + | | <b>When Braking, Accelerating & Turning</b> | ||
| + | Increase slow damper settings | ||
| + | |||
| + | <b>On Bumps / Curbs</b><br/> | ||
| + | Increase fast damper settings | ||
|} | |} | ||
</div> | </div> | ||
<div style="float:left; margin-right:1em;"> | <div style="float:left; margin-right:1em;"> | ||
| − | {| class="wikitable" width=" | + | {| class="wikitable" width="300px" |
|+ Other | |+ Other | ||
| − | ! | + | ! Tyres overheat |
| + | |- | ||
| + | | <b>All Over:</b> | ||
| + | 1. Increase pressures<br/> | ||
| + | 2. Decrease toe value<br/> | ||
| + | |||
| + | <b>On Inside Edge</b><br/> | ||
| + | Reduce negative camber | ||
| + | |||
| + | <b>On Outer Edge</b><br/> | ||
| + | Increase negative camber | ||
| + | |||
| + | <b>In Middle</b><br/> | ||
| + | Reduce pressures | ||
| + | |} | ||
| + | |||
| + | {| class="wikitable" width="300px" | ||
| + | |- | ||
| + | ! Tyres cold | ||
| + | |- | ||
| + | | <b>All Over:</b> | ||
| + | 1. Decrease pressures<br/> | ||
| + | 2. Increase toe value | ||
| + | |} | ||
| + | |||
| + | {| class="wikitable" width="300px" | ||
| + | |- | ||
| + | ! Car edgy during weight transfar | ||
| + | |- | ||
| + | | <b>When Braking, Accelerating & Turning</b> | ||
| + | Decrease slow damper setting | ||
| + | |||
| + | <b>On Bumps / Curbs</b> | ||
| + | Decrease fast damper setting<br/> | ||
| + | |} | ||
| + | |||
| + | {| class="wikitable" width="300px" | ||
| + | |- | ||
| + | ! Low top speed | ||
| + | |- | ||
| + | | Reduce wing values<br/> | ||
| + | |} | ||
| + | |||
| + | {| class="wikitable" width="300px" | ||
|- | |- | ||
| − | + | ! Car edgy during weight transfar | |
|- | |- | ||
| − | | | + | | <b>When Braking, Accelerating & Turning</b> |
| + | Decrease slow damper setting | ||
| + | |||
| + | <b>On Bumps / Curbs</b> | ||
| + | Decrease fast damper setting<br/> | ||
|} | |} | ||
</div> | </div> | ||
<div style="float:left; margin-right:1em;"> | <div style="float:left; margin-right:1em;"> | ||
| − | {| class="wikitable" width=" | + | {| class="wikitable" width="300px" |
|+ Tips | |+ Tips | ||
| − | ! | + | ! Ride height |
| + | |- | ||
| + | | As low as possible, but avoid grounding car or stalling the aero | ||
| + | |} | ||
| + | |||
| + | {| class="wikitable" width="300px" | ||
| + | |- | ||
| + | ! Dampers | ||
| + | |- | ||
| + | | Bump setting should be lower than the corresponding rebound setting | ||
| + | |||
| + | Try to use the lowest setting that avoids oscillation / bouncing | ||
| + | |||
| + | Can be used to tune the responsiveness of the car. | ||
| + | |||
| + | High values = more responsive<br/> | ||
| + | Low values = more stable | ||
| + | |} | ||
| + | |||
| + | {| class="wikitable" width="300px" | ||
| + | |- | ||
| + | ! Aero | ||
| + | |- | ||
| + | | Use ride height and rake to generate as much downforce as possible, then trim the aero balance using the wings and / or splitter. | ||
| + | |||
| + | Increasing the rake moves the aero balance backwards. | ||
| + | |||
| + | Run the car as stiff as needed to maintain stable ride height | ||
| + | |} | ||
| + | |||
| + | {| class="wikitable" width="300px" | ||
|- | |- | ||
| − | + | ! Brake bias | |
|- | |- | ||
| − | | | + | | Front tyres should lock just<br/> |
| + | before the rears for best stability | ||
|} | |} | ||
| + | </div> | ||
| + | |||
| + | <div style="float:left; margin-right:1em;"> | ||
| + | |||
| + | == Origin == | ||
| + | With the permission of Skaven Zverov the Setup Guide for Beginners from Him will be also Published here on the Wiki. | ||
| + | |||
| + | Adam Isailovic (Skaven Zverov): https://www.assettocorsa.net/forum/index.php?members/skaven-zverov.192248/ | ||
| + | ACC Forum Thread: https://www.assettocorsa.net/forum/index.php?threads/setup-guide-for-begginers.64264/ | ||
| + | |||
| + | [[File:Setup_guide_for_beginners.jpeg|thumb|left]] | ||
</div> | </div> | ||
Latest revision as of 12:43, 23 October 2020
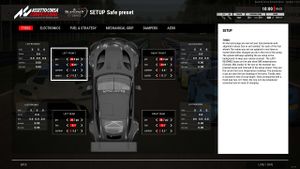
Tyres
Pressure
For GT3, Cup and ST cars the tyre pressure between 27.0 and 28.0 PSI is optimal for dry tyres. For wet tyres, it is between 30 and 31 PSI. For GT4 cars, tyre pressures between 26.5 and 27.0 PSI are optimal while racing in dry conditions.
What should you think of:
- Get tyre pressures in the range between 27 - 28 PSI resp. 26.5 - 27 PSI for GT4 cars.
- Use IMO tyre temperatures for tweaking of camber and toe settings
- If for whatever reason your tyre temperatures aren't in the operation window, use brake duct settings, since heat from the brakes also effects tyre temperatures
Toe
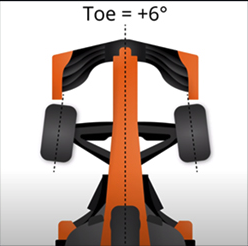
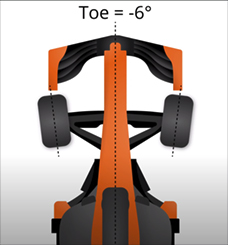
Angle of the wheels, looking from above. You should only have toe out in the front, and only toe in at the rear.
| In | Out |
|---|---|
Camber
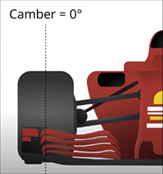
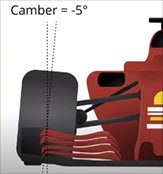
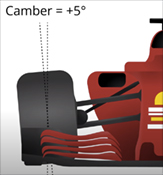
Camber enables more tyre surface area to touch the track, giving more grip, countering leaning of the car while turning. You should only have negative camber.
| Neutral | Negative | Positive |
|---|---|---|
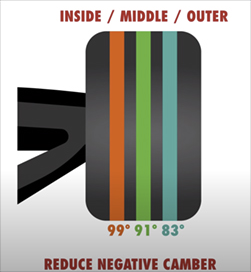
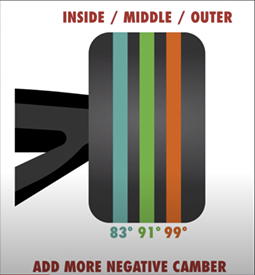
Check IMO Readings to set camber angle.
| Negative | Positive |
|---|---|
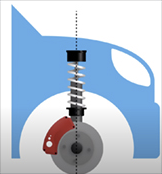
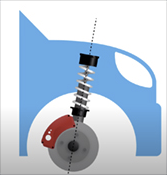
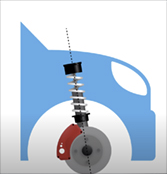
Caster
Caster angle impacts the stability of the car and how heavy the steering feels. It also causes car to steer to self center. For Sim Racers, that's not too important because of FFB settings, so it's best to leave it at the stock angle.
| Neutral | Negative | Positive |
|---|---|---|
Electronics
Fuel & Strategy
Brake Pads
There are 4 types of brake pads. By default, type 2 is selected.
Type 1: High performance, high wear. About 2.5 hours lifetime.
Type 2: Medium performance, medium wear. About 12 hours lifetime.
Type 3: Low performance, low wear. Used for cold conditions and rain.
Type 4: Very high performance, very high wear. Not normally used, but can be used for short practice and qualifying stints.
Mechanical Grip
Dampers
Aero
Solutions to Handling Issues
| Loss of Control |
|---|
|
1. Move brake bias forward |
| Front Tyres often lock |
|---|
| Move brake bias backward |
| Car pitches to much |
|---|
| Stiffen front springs |
| Nose hits floor |
|---|
|
1. Increase ride height |
| Excessive locking |
|---|
| Reduce overall brake pressure (use with caution) |
| Understeer |
|---|
| All Speeds:
1. Adjust front tyre pressures Mid-High Speed: When braking: |
| Oversteer |
|---|
| All Speeds:
1. Adjust rear tyre pressure Mid-High Speed: |
| Lift off oversteer |
|---|
|
1. Increase diff coast locking |
| Understeer |
|---|
| All Speeds:
1. Stiffen rear anti-roll bar Mid-High Speed: |
| Oversteer |
|---|
| All Speeds:
1. Soften rear anti-roll bar Mid-High Speed: |
| Lift off oversteer |
|---|
| PICNIC
(Problem in chair, not in car) |
| Car bounces during weight transfer |
|---|
| When Braking, Accelerating & Turning
Increase slow damper settings On Bumps / Curbs |
| Tyres overheat |
|---|
| All Over:
1. Increase pressures On Inside Edge On Outer Edge In Middle |
| Tyres cold |
|---|
| All Over:
1. Decrease pressures |
| Car edgy during weight transfar |
|---|
| When Braking, Accelerating & Turning
Decrease slow damper setting On Bumps / Curbs
Decrease fast damper setting |
| Low top speed |
|---|
| Reduce wing values |
| Car edgy during weight transfar |
|---|
| When Braking, Accelerating & Turning
Decrease slow damper setting On Bumps / Curbs
Decrease fast damper setting |
| Ride height |
|---|
| As low as possible, but avoid grounding car or stalling the aero |
| Dampers |
|---|
| Bump setting should be lower than the corresponding rebound setting
Try to use the lowest setting that avoids oscillation / bouncing Can be used to tune the responsiveness of the car. High values = more responsive |
| Aero |
|---|
| Use ride height and rake to generate as much downforce as possible, then trim the aero balance using the wings and / or splitter.
Increasing the rake moves the aero balance backwards. Run the car as stiff as needed to maintain stable ride height |
| Brake bias |
|---|
| Front tyres should lock just before the rears for best stability |
Origin
With the permission of Skaven Zverov the Setup Guide for Beginners from Him will be also Published here on the Wiki.
Adam Isailovic (Skaven Zverov): https://www.assettocorsa.net/forum/index.php?members/skaven-zverov.192248/ ACC Forum Thread: https://www.assettocorsa.net/forum/index.php?threads/setup-guide-for-begginers.64264/
